Introduction: The Importance of Accurate Line Marking in Renovations
As a renovator, I understand the crucial role that accurate line marking plays in ensuring the success of any renovation project. Whether you’re laying flooring, tiling walls, or installing cabinetry, the precision of your layout can make or break the final result. For high-quality line marking products, I recommend checking out Line Marker Paint, which has a wide selection of paints and tools to help you achieve professional-quality results. In this comprehensive guide, I will share my expertise and insights on mastering the art of line marking, helping you achieve professional-quality renovations every time.
Line marking is the foundation upon which your entire renovation project is built. It serves as a roadmap, guiding you through the process and ensuring that each element is positioned correctly. By taking the time to establish accurate layouts, you can avoid costly mistakes, reduce material waste, and achieve a flawless finish that showcases your craftsmanship.
Throughout this article, I will delve into the various aspects of line marking, from understanding the basics to exploring advanced techniques. We’ll cover the essential tools and materials required, discuss preparation and planning, and provide step-by-step instructions for marking techniques on different surfaces. Additionally, I’ll share valuable tips on avoiding common mistakes and ensuring quality control throughout the process.
Whether you’re a seasoned renovator looking to refine your skills or a DIY enthusiast tackling your first project, this guide will equip you with the knowledge and confidence to master the art of line marking. By following the advice and techniques outlined in this article, you’ll be well on your way to achieving precise layouts and delivering outstanding renovation results.
So, let’s dive in and explore the world of line marking together. Get ready to elevate your renovation game and create spaces that showcase your attention to detail and commitment to excellence.
Understanding the Basics of Line Marking
What is Line Marking?
Line marking is the process of creating accurate and precise reference lines on various surfaces to guide the placement and installation of materials during a renovation project. These lines serve as a visual blueprint, ensuring that each element of the renovation aligns perfectly with the overall design and layout.

In essence, line marking involves transferring measurements and dimensions from plans or drawings onto the actual work surface. By establishing these reference lines, renovators can maintain consistency, symmetry, and proper spacing throughout the project, resulting in a professional and polished final product.
Why is Line Marking Essential in Renovations?
Accurate line marking is the cornerstone of any successful renovation project. It plays a vital role in several key aspects:
- Precision and Alignment: Properly marked lines ensure that all elements of the renovation, such as flooring, tiling, cabinetry, and electrical outlets, are positioned accurately and align seamlessly with each other. This attention to detail prevents unsightly gaps, uneven surfaces, and misaligned components.
- Efficiency and Time-Saving: By investing time in careful line marking at the beginning of a project, renovators can save significant time and effort later on. Clear reference lines allow for quicker and more efficient installation, reducing the need for frequent adjustments and corrections.
- Material Optimization: Accurate line marking helps minimize material waste by ensuring that cuts and placement are precise. This not only saves on material costs but also contributes to a more sustainable and eco-friendly renovation approach.
- Aesthetic Appeal: Well-executed line marking translates into a visually pleasing and cohesive final result. Straight lines, even spacing, and precise alignments enhance the overall aesthetic of the renovated space, reflecting the skill and craftsmanship of the renovator.
Common Applications of Line Marking in Renovations
Line marking finds application in virtually every aspect of a renovation project. Some common examples include:
- Flooring Installation: Marking guidelines for laying hardwood, laminate, or tile flooring to ensure straight rows and even spacing.
- Wall Tiling: Creating reference lines for tile placement, ensuring level and plumb installations.
- Cabinetry and Millwork: Marking positions for base and wall cabinets, ensuring proper alignment and fit.
- Electrical and Plumbing Layouts: Marking the locations of electrical outlets, light fixtures, and plumbing fixtures on walls and floors.
- Drywall and Framing: Marking stud locations, drywall seams, and openings for doors and windows.
By understanding the significance of line marking and its wide range of applications, renovators can approach each project with a keen eye for detail and a commitment to precision.
Tools and Materials Required for Line Marking
To achieve accurate and professional-quality line marking, having the right tools and materials at your disposal is essential. In this section, we’ll explore the key items that every renovator should have in their line marking toolkit.
Measuring Tools
Tape Measures
Tape measures are the most basic and versatile measuring tools for line marking. They come in various lengths, typically ranging from 16 to 35 feet. When selecting a tape measure, consider factors such as the length of the blade, the durability of the housing, and the ease of reading the measurements. A high-quality tape measure with a locking mechanism and a smooth retracting action is ideal for accurate measurements.
Laser Measures

For quick and precise distance measurements, laser measures are a valuable addition to your toolkit. These handheld devices use a laser beam to calculate distances up to several hundred feet with pinpoint accuracy. They are particularly useful for measuring large spaces or hard-to-reach areas. Some advanced models even offer features like continuous measurement, area and volume calculations, and Bluetooth connectivity for easy data transfer.
Squares
Squares are indispensable for ensuring perpendicular lines and accurate 90-degree angles. The most common types include:
- Framing squares: Large, L-shaped squares used for marking and checking right angles in framing and carpentry work.
- Speed squares: Compact, triangular squares with multiple scales and markings for quick and accurate measuring and marking.
- Combination squares: Versatile tools that combine a ruler with an adjustable square head, allowing for marking 45 and 90-degree angles, as well as measuring depths and distances.
Marking Tools
Chalk Lines
Chalk lines are the go-to tool for marking long, straight lines on various surfaces. They consist of a string-line reel filled with chalk powder. When the string is pulled taut and snapped against the surface, it leaves a visible chalk line. Chalk lines are ideal for marking guidelines on floors, walls, and ceilings. They are available in different colors, allowing for clear visibility on various surface types.
Pencils and Markers
Pencils and markers are essential for marking precise reference points, making notes, and creating temporary guidelines. Carpenter pencils, with their flat shape and sturdy lead, are well-suited for marking on rough surfaces like wood and concrete. Fine-tipped markers, on the other hand, are great for marking on smooth surfaces like drywall and laminate.
Scribers
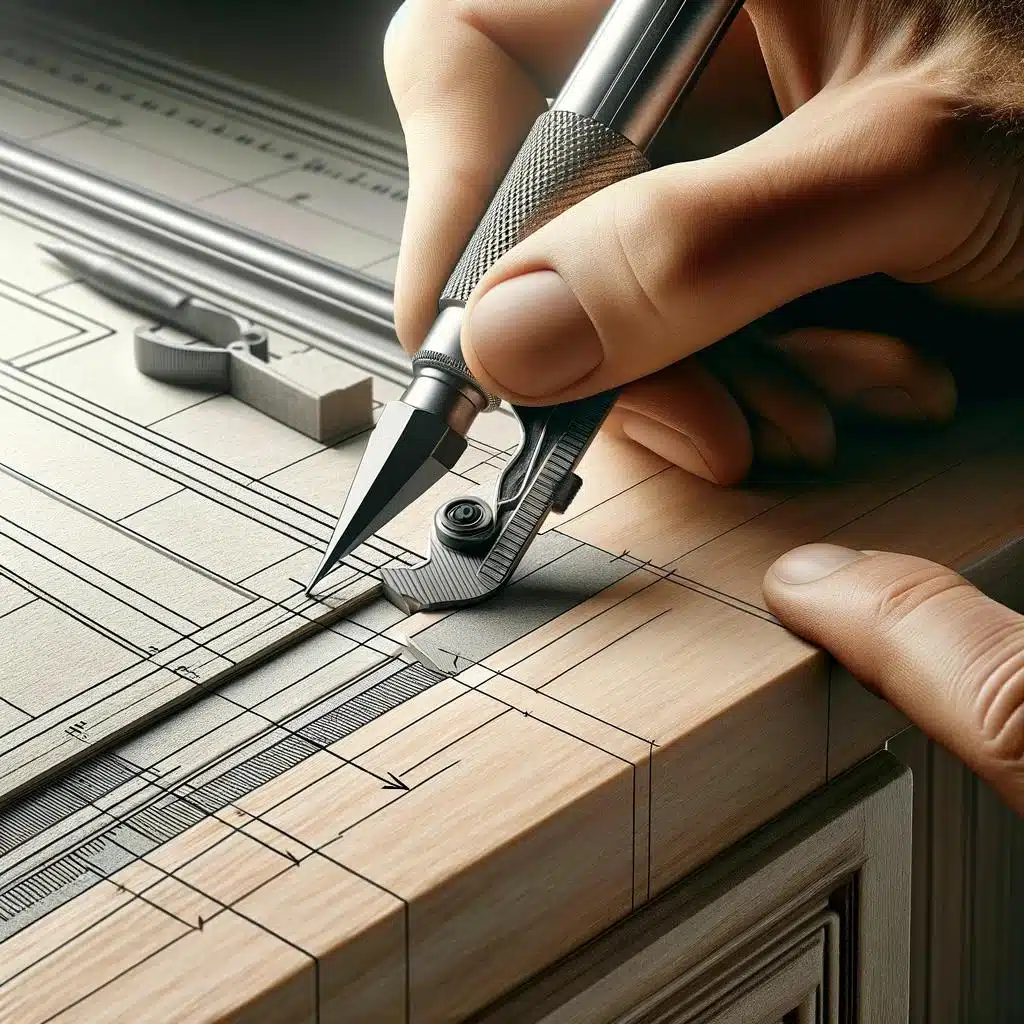
Scribers are specialized marking tools used for transferring contours and profiles from one surface to another. They consist of a sharp point or blade attached to an adjustable arm. Scribers are particularly useful for marking cuts on countertops, fitting baseboards, and scribing lines for custom installations.
Other Essential Tools
Levels
Levels are crucial for ensuring that lines and surfaces are perfectly horizontal, vertical, or at a specific angle. The most common types include:
- Spirit levels: Traditional levels with bubble vials that indicate when a surface is level or plumb.
- Laser levels: High-tech levels that project a laser line or dot onto a surface for accurate alignment over long distances.
- Digital levels: Electronic levels that display the angle of inclination on a digital readout.
Plumb Bobs

Plumb bobs are weighted, pointed tools suspended on a string that are used for establishing vertical reference lines. They are particularly useful for aligning elements over multiple floors or transferring points from the ceiling to the floor.
String Lines
String lines are thin, durable strings or cords used for creating long, straight reference lines. They are often used in conjunction with stakes or pins to establish guidelines for fences, decks, or large-scale layouts.
By having a well-stocked line marking toolkit, renovators can tackle any marking task with confidence and precision. Investing in quality tools will not only make the marking process more efficient but also contribute to the overall success and professionalism of the renovation project.
Preparing for Line Marking
Before diving into the actual line marking process, proper preparation is key to ensuring accurate and efficient results. In this section, we’ll discuss the essential steps for setting up your work area and establishing reference points and lines.
Assessing the Work Area
Start by thoroughly assessing the work area where the line marking will take place. Consider factors such as the size of the space, the type of surfaces involved, and any obstacles or constraints that may impact the layout. Take note of any existing reference points, such as walls, corners, or fixed elements that can serve as starting points for your measurements.
Cleaning and Clearing the Surface
To ensure clear and precise line marking, it’s crucial to prepare the surface by cleaning and clearing any debris or obstructions. Remove dust, dirt, and loose particles using a broom, vacuum, or damp cloth, depending on the surface type. If there are any protruding nails, screws, or other obstacles, remove or flush them with the surface to create a smooth and even workspace.
Determining the Layout
Before marking any lines, take the time to carefully study the renovation plans or drawings to determine the desired layout. Identify the key dimensions, such as room sizes, wall locations, and the placement of specific elements like doors, windows, and fixtures. Consider any design features or patterns that need to be incorporated into the line marking process.
If possible, create a scaled sketch or use a digital tool to map out the layout on paper. This step helps visualize the overall design and identifies any potential challenges or adjustments that may be necessary.
Setting Up Reference Points and Lines
Establishing a Benchmark
To ensure accuracy and consistency throughout the line marking process, it’s essential to establish a reliable benchmark. A benchmark is a fixed point from which all other measurements and lines will be derived. This can be an existing architectural feature, such as a corner of a room or a specific point on a wall.
Using a measuring tape or laser measure, determine the distance from the benchmark to the desired starting point of your layout. Mark this point clearly using a pencil or marker.
Using a Plumb Bob for Vertical Alignment
For layouts that involve vertical elements, such as walls or columns, using a plumb bob is an effective way to ensure precise vertical alignment. Suspend the plumb bob from a fixed point at the desired height, allowing it to hang freely. Once the plumb bob stabilizes, mark the point directly below it on the floor or surface. Repeat this process at multiple points to create a series of vertically aligned reference marks.
Creating Perpendicular Lines with 3-4-5 Triangle Method
When marking perpendicular lines, the 3-4-5 triangle method is a reliable technique. This method is based on the principle that a triangle with sides measuring 3, 4, and 5 units forms a perfect right angle.
To use this method, start by marking a point along your reference line. Measure 3 units from this point and make a mark. Then, from the same starting point, measure 4 units perpendicular to the reference line and make another mark. Finally, measure the distance between the two marks you just made. If it equals 5 units, you have a perfect right angle. If not, adjust the marks until the 3-4-5 ratio is achieved.
By following these preparation steps and establishing accurate reference points and lines, you set the foundation for successful line marking. Taking the time to properly assess the work area, determine the layout, and create reliable benchmarks will save time and ensure precision throughout the renovation process.
Marking Techniques for Different Surfaces
Accurate line marking requires adapting your techniques to the specific surface you’re working on. Different materials have unique characteristics that influence the choice of tools and methods used for marking. In this section, we’ll explore the most effective marking techniques for common surfaces encountered in renovation projects.
Concrete and Masonry Surfaces
Concrete and masonry surfaces, such as floors, walls, and foundations, require robust marking tools that can withstand the rough texture and hardness of the material. The following techniques are well-suited for these surfaces:
- Chalk lines: For long, straight lines on concrete floors or walls, chalk lines are the go-to tool. Snap the chalk line against the surface, creating a clear and visible guideline. Be sure to use chalk that is specifically formulated for use on concrete to ensure good adhesion and durability.
- Scribers or metal markers: For shorter, more intricate lines or for marking cut lines on concrete, use a scriber or a metal marker. These tools create a thin, precise line that can be easily followed with a saw or cutting tool.
- Permanent markers: When marking on smooth concrete surfaces, such as polished floors or precast elements, permanent markers provide a clear and long-lasting line. Choose a marker with a fine tip for accurate and detailed marking.
Drywall and Plasterboard
Drywall and plasterboard are commonly used for interior walls and ceilings. When marking on these surfaces, consider the following techniques:
- Pencils: For general layout lines and markings, carpenter pencils or standard pencils work well on drywall. The graphite leaves a clear, erasable line that can be easily removed or painted over.
- Marking knives: For more precise lines, such as those needed for cutting or scoring drywall, use a marking knife. These tools create a thin, sharp line that serves as a guide for cutting tools.
- Laser levels: When marking long, horizontal lines on drywall, such as those for installing chair rails or wainscoting, a laser level is an efficient and accurate tool. It projects a straight, visible line onto the surface, eliminating the need for manual measuring and marking.
Wood and Laminate Surfaces
Wood and laminate surfaces, including floors, furniture, and cabinetry, require marking techniques that preserve the integrity of the material. Consider the following methods:
- Pencils: For general layout lines and markings on wood, carpenter pencils or standard pencils are suitable. The graphite can be easily erased or sanded off without damaging the surface.
- Marking gauges: For precise, parallel lines on wood, such as those needed for cutting dados or rabbets, a marking gauge is an essential tool. It consists of a beam with an adjustable fence and a scribing pin that creates a consistent, accurate line.
- Tape: When marking on finished wood surfaces or laminates, use low-adhesive tape, such as painter’s tape or masking tape. Apply the tape along the desired line and use a pencil or fine-tipped marker to mark on top of the tape. This method prevents direct contact with the surface and ensures clean, residue-free removal.
Tile and Stone Surfaces
Tile and stone surfaces require marking techniques that can accommodate their hard, smooth, and often glossy finishes. The following methods are effective for these materials:
- Wax pencils or china markers: For marking on glazed tiles or polished stone, use a wax pencil or china marker. These tools create a clear, temporary line that can be easily wiped off with a damp cloth.
- Grease pencils: For unglazed tiles or natural stone surfaces, grease pencils provide a visible, smudge-resistant line. They are available in various colors, making them suitable for different tile and stone shades.
- Tape and marker: Similar to the method used for wood and laminate surfaces, apply low-adhesive tape along the desired line on the tile or stone surface. Use a permanent marker to mark on top of the tape, ensuring a clean and precise line upon removal.
By selecting the appropriate marking techniques for each surface type, renovators can achieve accurate and professional-looking lines while minimizing the risk of damage or residue. Experimenting with different tools and methods on scrap materials can help determine the best approach for your specific project.
Marking Straight Lines
Marking straight lines is a fundamental skill in line marking, as it forms the basis for many renovation tasks. Whether you’re laying flooring, tiling walls, or installing trim, the ability to create perfectly straight lines is essential. In this section, we’ll explore the most effective techniques for marking straight lines on various surfaces.
Using a Chalk Line
Chalk lines are the go-to tool for marking long, straight lines on floors, walls, and ceilings. They consist of a string line coated with chalk powder, housed in a compact reel. To use a chalk line, follow these steps:
- Measure and mark the starting and ending points of your desired line using a pencil or marker.
- Secure one end of the chalk line at the starting point, either by holding it in place or attaching it to a fixed object.
- Unreel the chalk line and extend it to the ending point, ensuring that it is taut and aligned with your marks.
- Lift the string line a few inches away from the surface, and then snap it firmly against the surface, creating a straight, visible chalk line.
- Repeat the process if necessary to achieve a darker or more defined line.
Snapping a Line with Powdered Chalk
For more intricate layouts or when working on surfaces where a chalk line may not be practical, you can use powdered chalk to create straight lines. This method involves the following steps:
- Measure and mark the starting and ending points of your desired line.
- Place a straightedge, such as a level or a ruler, along the marked points, ensuring that it is perfectly aligned.
- Dip a chalk line or a string into powdered chalk, coating it evenly.
- Hold the chalked string line against the straightedge, and then pull it taut.
- Snap the string line against the surface, leaving a fine, straight chalk line along the straightedge.
- Carefully remove the straightedge, taking care not to smudge or disturb the chalk line.
Marking Lines with a Laser Level
Laser levels offer a high-tech solution for marking straight lines, particularly over long distances or in hard-to-reach areas. These tools project a perfectly straight laser beam onto the surface, providing a visible guideline. To use a laser level for marking lines, follow these steps:
- Set up the laser level on a stable surface or tripod, ensuring that it is level and at the desired height.
- Adjust the laser level until the beam is aligned with your desired starting and ending points.
- If necessary, use a measuring tape to verify the accuracy of the laser line’s position.
- Mark along the laser line using a pencil, marker, or chalk, depending on the surface type.
- Repeat the process for any additional lines needed, repositioning the laser level as required.
Marking Curved and Irregular Lines
While straight lines form the foundation of most renovation projects, there are instances where curved or irregular lines are necessary. Whether you’re creating a decorative pattern, fitting countertops, or installing custom millwork, the ability to accurately mark curved and irregular lines is crucial. In this section, we’ll explore techniques for marking these types of lines.
Using Flexible Curve Templates
Flexible curve templates are versatile tools that can be bent and shaped to match the desired curve or contour. They are typically made of a pliable material, such as plastic or rubber, and can be used to transfer curved lines onto various surfaces. To use a flexible curve template, follow these steps:
- Place the template against the surface where you want to mark the curved line.
- Bend and adjust the template until it matches the desired shape or contour.
- Trace along the edge of the template using a pencil, marker, or scriber, depending on the surface type.
- Carefully remove the template, taking care not to smudge or distort the marked line.
- Repeat the process for any additional curved lines needed.
Creating Custom Templates
In some cases, you may need to create a custom template to match a specific curved or irregular shape. This is particularly useful when working with unique architectural features or custom designs. To create a custom template, consider the following methods:
- Cardboard or paperboard: For simple curves or shapes, trace the desired contour onto a piece of cardboard or heavy paperboard. Cut along the traced line using a utility knife or scissors, creating a sturdy template that can be used for marking.
- Plywood or MDF: For more complex or durable templates, use a piece of thin plywood or medium-density fiberboard (MDF). Transfer the desired shape onto the material, and then cut it out using a jigsaw or bandsaw. Sand the edges smooth to ensure a clean and accurate template.
- 3D printing: For intricate or precise shapes, consider using a 3D printer to create a custom template. Design the template using CAD software, and then print it using a durable, rigid material. This method allows for high accuracy and repeatability.
Freehand Marking Techniques
In some situations, freehand marking may be the most efficient or practical option, particularly for short, organic curves or when working in tight spaces. To achieve accurate freehand lines, consider the following tips:
- Use a steady hand: Practice maintaining a steady grip and consistent pressure when marking freehand lines. Brace your hand against a stable surface if necessary to minimize shakiness.
- Break up long curves: If you need to mark a long, curved line, break it up into shorter segments. Mark several points along the desired curve, and then connect them using a smooth, flowing motion.
- Use reference points: Before marking the final line, create reference points or dots along the desired path. These points serve as guides to help maintain the curve’s shape and consistency.
- Embrace imperfections: Freehand lines may not be perfectly smooth or uniform, but they can add character and a handcrafted touch to your renovation project. Embrace the slight irregularities as part of the design’s charm.
By mastering these techniques for marking curved and irregular lines, renovators can tackle a wide range of design challenges and create unique, eye-catching elements in their projects.
Marking for Specific Renovation Tasks
While the general principles of line marking apply to most renovation projects, certain tasks require specific techniques and considerations. In this section, we’ll explore line marking methods for common renovation tasks, such as flooring installation, wall tiling, electrical and plumbing layouts, and cabinetry and millwork.
Marking for Flooring Installation
When marking for flooring installation, consider the following tips:
- Establish a starting line: Determine the most visible wall in the room and measure out from it to establish a starting line for your flooring. This line should be perpendicular to the wall and serve as a reference for the rest of the installation.
- Allow for expansion gaps: When marking the perimeter of the room, account for the necessary expansion gaps between the flooring and the walls. These gaps, typically 1/4 to 1/2 inch, allow the flooring to expand and contract with changes in temperature and humidity.
- Mark joist locations: If you’re installing hardwood or engineered flooring, locate and mark the positions of the floor joists. This information helps you plan the layout and ensures that the flooring is properly supported.
- Use a layout stick: For plank-style flooring, create a layout stick by marking the width of several planks, including the spacing between them, on a straight piece of lumber. Use this stick to quickly mark the positions of the planks across the room, ensuring consistent spacing and alignment.
Marking for Wall Tiling
When marking for wall tiling, keep the following points in mind:
- Find the center point: Measure the width and height of the wall and mark the center point. This serves as a starting point for your tile layout, helping you achieve a balanced and symmetrical design.
- Plan for cut tiles: Determine the locations of any cut tiles, such as those around outlets, windows, or at the edges of the wall. Mark these areas to ensure accurate cuts and a seamless installation.
- Use a level line: Establish a perfectly horizontal line using a laser level or a long spirit level. This line serves as a reference for the first row of tiles, ensuring that the installation remains level as you work your way up the wall.
- Mark stud locations: If you’re installing heavy tiles or applying them to a substrate like drywall, mark the locations of the wall studs. This information helps you plan the layout and ensures that the tiles are securely attached to the wall.
Marking for Electrical and Plumbing Layouts
When marking for electrical and plumbing layouts, consider the following:
- Consult the plans: Carefully review the electrical and plumbing plans to identify the locations of outlets, switches, fixtures, and pipes. Transfer these locations onto the walls, floors, or ceilings using a measuring tape and a pencil or marker.
- Use templates: For common fixtures like electrical boxes or plumbing valves, create templates out of cardboard or plywood. These templates help you mark the precise cutout sizes and locations, ensuring a perfect fit.
- Mark for accessibility: Consider the placement of electrical and plumbing components in relation to the room’s layout and functionality. Ensure that outlets, switches, and fixtures are easily accessible and positioned logically for the intended use of the space.
- Coordinate with other trades: Communicate and coordinate with other professionals, such as electricians and plumbers, to ensure that your markings align with their requirements and specifications.
Marking for Cabinetry and Millwork
When marking for cabinetry and millwork installation, keep the following in mind:
- Reference points: Establish clear reference points, such as the highest point of the floor or the lowest point of the ceiling, to ensure that your markings are accurate and consistent across the space.
- Mark for level and plumb: Use a laser level or a long spirit level to mark perfectly horizontal lines for base cabinets and countertops. Similarly, use a plumb bob or a laser plumb to mark vertical lines for wall cabinets and tall units.
- Account for appliances: Measure and mark the locations of any built-in appliances, such as ovens, refrigerators, or dishwashers. Ensure that the cabinetry layout accommodates these appliances and provides the necessary clearances for proper installation and ventilation.
- Plan for scribing: In cases where the walls or floors are not perfectly straight or level, mark the areas where scribing or custom fitting will be necessary. This involves marking the contours of the wall or floor onto the cabinetry and then cutting or sanding the material to achieve a seamless fit.
By tailoring your line marking techniques to the specific requirements of each renovation task, you can ensure accurate and efficient installations, resulting in a professional-quality finish.
Avoiding Common Line Marking Mistakes
Even the most experienced renovators can fall victim to common line marking mistakes. These errors can lead to costly rework, wasted materials, and delays in the project timeline. In this section, we’ll identify some of the most frequent line marking pitfalls and provide tips on how to avoid them.
Not Double-Checking Measurements
One of the most common mistakes in line marking is failing to double-check measurements. Inaccurate measurements can result in misaligned elements, poor fitting, and an overall unsatisfactory finish. To avoid this issue:
- Measure twice, mark once: Always take the time to measure a distance or dimension at least twice before marking your lines. Compare the measurements to ensure they are consistent and accurate.
- Use a reliable measuring tool: Invest in high-quality measuring tools, such as a sturdy tape measure or a precision laser measure, to minimize the risk of inaccuracies.
- Verify against the plans: Regularly cross-reference your measurements with the project plans or drawings to ensure that you’re marking the correct dimensions and locations.
Failing to Use Proper Anchoring Techniques
When marking lines that require a taut string line or chalk line, failing to properly anchor the line can lead to sagging, shifting, or inaccurate markings. To ensure a stable and precise line:
- Use sturdy anchors: Secure the ends of your string line or chalk line to solid, immovable objects. This can include nails, screws, or specialized anchoring devices designed for line marking.
- Maintain consistent tension: When snapping a chalk line or pulling a string line taut, apply consistent tension along the entire length of the line. Uneven tension can cause the line to bow or deviate from the intended path.
- Recheck the line: After anchoring and tensioning the line, take a moment to visually inspect it from various angles. Ensure that the line is straight, level, and aligned with your reference points before proceeding with marking.
Ignoring Surface Irregularities
Failing to account for surface irregularities, such as bumps, dips, or undulations, can result in inaccurate or uneven markings. To overcome this challenge:
- Assess the surface: Before marking any lines, carefully inspect the surface for irregularities. Note any high or low spots that may impact the accuracy of your markings.
- Use a straightedge: When marking lines on an uneven surface, use a long, rigid straightedge to bridge any gaps or inconsistencies. This helps maintain a straight line despite the surface variations.
- Compensate for irregularities: In some cases, you may need to adjust your markings to compensate for surface irregularities. This might involve shimming or scribing the material to achieve a flush and seamless fit.
Using Incorrect Marking Tools for the Surface
Using the wrong marking tool for a given surface can lead to inaccurate, unclear, or damaging lines. To ensure clean and precise markings:
- Match the tool to the surface: Select a marking tool that is appropriate for the surface you’re working on. For example, use a wax pencil or china marker on glossy tiles, a grease pencil on unfinished wood, and a fine-tipped permanent marker on smooth drywall.
- Test on a scrap piece: Before marking on the actual surface, test your chosen tool on a scrap piece of the same material. This allows you to assess the clarity, durability, and ease of removal of the markings.
- Protect delicate surfaces: When marking on delicate or easily damaged surfaces, consider using low-adhesive tape as a protective barrier. Apply the tape along the marking path, mark on top of the tape, and then carefully remove it to reveal a clean, crisp line.
By being aware of these common line marking mistakes and taking proactive steps to avoid them, renovators can ensure accurate, efficient, and professional-quality results in their projects.
Advanced Line Marking Techniques
As renovators gain experience and tackle more complex projects, they may encounter situations that require advanced line marking techniques. These methods can help streamline the marking process, improve accuracy, and accommodate unique design challenges. In this section, we’ll explore some of these advanced techniques and how they can be applied in various renovation scenarios.
Using Storyboards and Jigs for Repetitive Marking
When a renovation project involves multiple identical or repetitive elements, such as a series of equally spaced shelves or a pattern of decorative tiles, using storyboards or jigs can significantly speed up the marking process and ensure consistency. To create and use a storyboard or jig:
- Measure and mark the pattern: On a piece of cardboard, plywood, or MDF, measure and mark the desired pattern or spacing for your repetitive elements. This may include the positions of shelves, tiles, or other components.
- Create the jig: Cut out the marked sections of the storyboard or jig using a utility knife, jigsaw, or CNC machine, depending on the material and complexity of the pattern. The resulting template should have openings or slots that correspond to the desired marking positions.
- Align and mark: Place the storyboard or jig against the surface where you need to mark the repetitive elements. Align it with your reference lines or points, and then use a pencil or marker to transfer the pattern onto the surface through the openings in the template.
- Repeat and adjust: Move the storyboard or jig along the surface, aligning it with the previous markings and repeating the process until the entire area is marked. If necessary, make adjustments to accommodate any variations or irregularities in the surface.
Incorporating Technology: Laser Projectors and Digital Templates
Advancements in technology have introduced new tools and techniques that can greatly enhance the accuracy and efficiency of line marking. Two notable examples are laser projectors and digital templates.
Laser projectors are devices that project a precise, high-definition image onto a surface, essentially creating a virtual template. They can be used to project complex patterns, layouts, or designs onto floors, walls, or ceilings, eliminating the need for physical templates or extensive measuring and marking. To use a laser projector:
- Create or import the design: Develop your design using CAD software or import an existing digital template into the laser projector’s software.
- Calibrate the projector: Set up the laser projector in the desired location and calibrate it to the surface. This typically involves aligning the projected image with reference points on the surface and adjusting for any distortions or angles.
- Mark the projected lines: With the design accurately projected onto the surface, use a pencil or marker to trace along the laser lines, transferring the pattern onto the surface.
Digital templates are another technology-based solution for line marking. These templates are created using CAD software and can be printed on large-format printers or plotters. The printed templates can then be adhered to the surface, serving as a guide for marking and cutting. To use digital templates:
- Design the template: Create your template using CAD software, ensuring that it is accurately scaled and includes all necessary dimensions and reference points.
- Print the template: Print the template on a large-format printer or plotter, using a material suitable for your application, such as adhesive-backed vinyl or heavy-duty paper.
- Apply the template: Carefully align and adhere the printed template to the surface, smoothing out any bubbles or wrinkles.
- Mark and cut: Use the template as a guide for marking and cutting your material, following the printed lines and patterns.
Creating Multi-Level Layouts
In some renovation projects, you may need to create layouts that span multiple levels or planes, such as stairways, terraced floors, or vaulted ceilings. To accurately mark these multi-level layouts:
- Establish a common reference point: Identify a common reference point that can be used to align your markings across the different levels. This could be a corner, a centerline, or a fixed architectural feature.
- Use a laser level or plumb bob: To transfer markings vertically between levels, use a laser level or plumb bob. These tools allow you to project a straight line or point from one level to another, ensuring accurate alignment.
- Create a story pole: For marking stairs or other stepped layouts, create a story pole by marking the heights and positions of the steps on a long, straight piece of lumber. Use this pole to transfer the layout onto the actual surface, aligning it with your reference points.
- Work in sections: Break down the multi-level layout into smaller, manageable sections. Mark and complete one section at a time, using your reference points and alignment tools to ensure continuity and accuracy between sections.
By incorporating these advanced line marking techniques into your renovation projects, you can tackle more complex designs, improve efficiency, and achieve professional-quality results.
Quality Control and Verification
Once you’ve completed your line marking, it’s essential to perform quality control checks and verify the accuracy of your work. This final step helps identify any errors or discrepancies before proceeding with the actual renovation work, saving time, money, and materials in the long run. In this section, we’ll discuss the key aspects of quality control and verification in line marking.
Checking for Accuracy and Consistency
The first step in quality control is to thoroughly check your marked lines for accuracy and consistency. This involves:
- Measuring distances: Use a tape measure or laser measure to verify that the distances between your marked lines match the intended dimensions. Pay close attention to critical measurements, such as the spacing between tiles or the width of doorways.
- Checking angles: Use a square or protractor to ensure that any angles in your layout are accurate. This is particularly important for tasks like installing flooring or tiling, where even slight deviations can lead to visible misalignments.
- Verifying plumb and level: Use a plumb bob or laser level to confirm that vertical lines are truly plumb and horizontal lines are perfectly level. Misalignments in these aspects can cause issues with the installation of cabinetry, trim, or other architectural elements.
- Comparing to plans: Refer back to your project plans or drawings and compare your marked lines to the intended layout. Verify that the positions and dimensions of key features, such as walls, openings, and fixtures, match the plans accurately.
Making Necessary Adjustments
If, during your quality control checks, you discover any inaccuracies or inconsistencies in your line marking, it’s crucial to make the necessary adjustments before proceeding. Depending on the nature and extent of the issue, you may need to:
- Erase and remark: For minor discrepancies, you may be able to erase the incorrect line and remark it accurately. Be sure to thoroughly remove any residue from the original marking to avoid confusion.
- Adjust reference points: If the issue stems from an inaccurate reference point, you may need to adjust your benchmarks or starting points and remark the affected lines accordingly.
- Recalculate and remeasure: In cases where the error is due to a miscalculation or mismeasurement, take the time to recalculate your dimensions and remeasure the lines. It’s better to invest the extra effort in getting it right than to proceed with an inaccurate layout.
- Consult with professionals: If you’re unsure about how to resolve a particular issue or if the problem is beyond your expertise, don’t hesitate to consult with other professionals, such as architects, engineers, or experienced contractors. They can provide guidance and help you find the best solution.
Documenting the Final Layout
Once you’ve completed your quality control checks and made any necessary adjustments, it’s a good practice to document the final layout. This documentation serves as a reference for the subsequent stages of the renovation project and can be useful for future maintenance or modifications. To document your line marking:
- Take photographs: Use a high-quality camera or smartphone to take clear, well-lit photographs of your marked lines. Capture overall views as well as close-up shots of key details and measurements.
- Create as-built drawings: If your project involves significant changes to the original plans, create a set of as-built drawings that accurately reflect the final layout. These drawings should incorporate any modifications or adjustments made during the line marking process.
- Keep a written record: Maintain a written record of your line marking process, including the tools and techniques used, any challenges encountered, and the solutions implemented. This information can be valuable for reference and learning purposes.
By conducting thorough quality control checks, making necessary adjustments, and documenting the final layout, you can ensure that your line marking provides a solid foundation for the subsequent stages of your renovation project.
Conclusion: Mastering Line Marking for Professional Results
Line marking is a critical skill that every renovator must master to achieve professional-quality results. By understanding the importance of accurate layouts, selecting the right tools and techniques, and following best practices for marking on various surfaces, you can elevate your renovation projects to new heights.
Throughout this guide, we’ve covered the essential aspects of line marking, from the basics of measuring and marking tools to advanced techniques for complex layouts. We’ve discussed the specific considerations for marking on different surfaces, such as concrete, drywall, wood, and tile, and provided tips for achieving straight, curved, and irregular lines.
We’ve also highlighted the importance of proper preparation, including assessing the work area, cleaning and clearing the surface, and establishing reliable reference points. By taking the time to plan and prepare your layout carefully, you can avoid costly mistakes and ensure a smooth, efficient marking process.
In addition to the technical skills, we’ve emphasized the value of quality control and verification in line marking. By thoroughly checking your work for accuracy and consistency, making necessary adjustments, and documenting the final layout, you can catch and correct any errors before they become larger issues down the line.
As you continue to develop your line marking skills, remember that practice and patience are key. Don’t be discouraged if your first attempts are not perfect; with time and experience, you’ll refine your techniques and develop a keen eye for precise layouts.
Embrace the opportunity to learn from other professionals, attend workshops or training sessions, and stay updated on the latest tools and technologies in line marking. By continuously expanding your knowledge and skills, you’ll be well-equipped to tackle even the most challenging renovation projects with confidence and expertise.
In conclusion, mastering the art of line marking is an essential step in achieving professional-quality renovation results. By following the guidelines and techniques outlined in this guide, you’ll be able to create accurate, efficient, and visually appealing layouts that serve as the foundation for stunning transformations.
So, grab your tools, embrace the challenge, and let your line marking skills shine through in every renovation project you undertake. With dedication and practice, you’ll soon be known as a true master of the art of line marking.


